
Changing device
Move tool is the most important tools used in Photoshop - choosing which one you're using this change only. To select a device, press the letter V on your keyboard. It looks like a black arrow.move
open image
From the menu bar, go to Options and click on Open to open the image. (Or), press Ctrl + command by using the keyboard! To open a picture. Click here to open a sample image in a new tab. Your screen looks something like the following when you're done.
marquee tool
It's the most basic of all devices. To select the device, just click on the letter M on the keyboard. Marquee is three variations in device
Rectangular Marquee tool.
Elliptical marquee tool for circles and ellipses.
Single-pixel Marquee for both vertical and horizontal.
Select the elliptical marquee tool has now put in place the cursor over your image, then click and drag the mouse; The selection has expanded, with the value of the pixel to the right of choice, and then release the mouse button. In the center of the selection and move the cursor, you will see how to move with you. You can apply filters to select, move, and copy it. What you can do in Photoshop starts with recruiting.


Tools lasso
Lasso tools are closely related to the Marque. This tool is used to make free-form selections. Left click the letter of the keyboard to select the device. There are three variations of the tool Lasso
Tool Lasso.
Polygon Lasso tool.
Magnetic Lasso tool.
First select the Lasso tool, click and hold the cursor and draw around the house. The end where you started. To select an inactive command press Ctrl + D.


To move the cursor to a polygon LassoTool press Command + Shift + l. Click anywhere on the image. Observe, if you move your mouse, point snap, and dashes that extend towards the cursor. Click again and has become a point after the snap, and you can continue to click until your selection is complete. Press the Esc key on your keyboard to cancel selection in progress.
Again, press Shift-L to select the Magnetic Lasso tool. Tools such as Lasso black cursor is in the upper left of the cursor. If you drag, the selection snaps as you move.As you reach, at the top of the window, Photoshop, some editing tools available include feather, anti-alias, width, contrast, and Frequency. Try each of these and see what effect they have on your selection.
Quick selection tool
Click to write this letter to select the device. There is another variation of the device, the Magic Wand tool.
Click and hold the image in the center of the house. While dragging to the left or the right, it means clean with the cursor and notice how the selection grows as you do. If you choose the roof, balcony, and all the rest of the house, you may notice that some of the other stories were selected.
To eliminate the shrubbery with a selection tool quickly is to choose the version withdrawal of the device, or just press and hold the Alt key, which for a short-term switch the device to version withdrawal and you can monitor the modified change at the top of the screen.


Click and drag a bit on something else, and it will be selected and you can adjust the sensitivity of the selection by adjusting the size.
Crop tool
This is a tool used in Photoshop most. It can improve the composition very much your photos. Tape device to select the letter, two other variations in the crop. They are the tools Slice Slice Select tool.
To crop the image, click and drag over the area you want to crop. The result is a region that is cut will be overshadowed. Make selections equal, and then press Enter. Observe how that changed the whole focus of the image. To restore the image to its original size, everything else, press Ctrl + Z. You can step back through your history using Ctrl + Alt + Z.


Crops used to adjust the perspective views of the picture as you cropped. It is a powerful tool and interesting, and it's more advanced features.
Slice as part of menu crops. These are designed to carve an image for placement into a Web page.
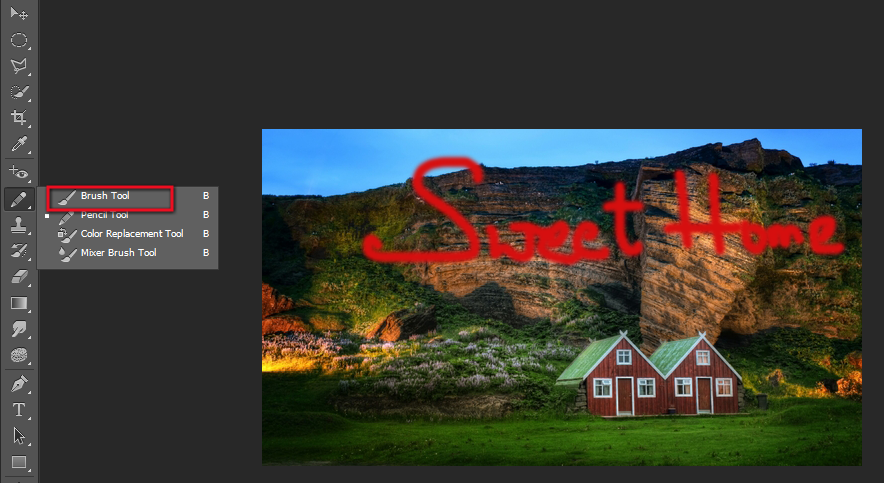
text tool
Generally, a picture is worth a thousand words, but sometimes you want. Click near the bottom of the image with the device and blinking text cursor while you will see on the image. "Sweet Home" and depending on it will be very large or small, or hard to read. Text attributes at the top of the Photoshop window.


Font Family: This menu allows you to choose the desired font. Type the name of the font, and it will fill in automatically when you type (or) you can select from a list of fonts.
Font styles: font family, font styles, such as bold, italic, light, medium, they will be available in this menu.
Font size: Adjust the size of the font. Choose from the list or you have the option to enter a specific font size.
Saadi against: it determines the strength of the edge. To close the fake anti select "No", and the text is to be like it was in 1984.
Justification: In the selected layer justifies all text to the left, center or right.
color: To change click on the chip and choose a. If no text is selected and all future articles will be presented with new selected. Chip color will display a question mark (?), It means you have selected a text field that contains multiple colors and other text attributes will appear as blank space.
Distortion: "warps" the text on the horizontal or vertical axis, or bending. Select the text layer and click on Warp.
Commission: To edit your text, click on the button panel. It will open up with character and paragraph. You will change the format of the text with this option.
Drawing Tools
brush tool
This device is a color replacement tool, the pencil tool, and mixed brush. Select the device by pressing the letter B on your keyboard. You can use different brushes here. Everything matched so very little feature of the pencil tool against counterfeit. For the replacement color or range of a device with a black man instead of Color can be useful.
You can adjust the opacity and flow. Adjust the opacity, transparency and the flow adjustment mode are laid on the canvas with strokes. Clear canvas by pressing the Delete command headquarters and fill your canvas with the background. Replace command will fill with the foreground.
Pick a brush easier with tobacco picker at the top left of the window Photoshop. The diameter of the brush is determined by the size and difficulty in referring edge. You can use the slider or enter a number directly.
Brush mix: mix different colors together, the way the artist's mixture on a palette. Pick a chip and click on the foreground office at the bottom of the list.
shapes
This tool is used to draw the shape you want and allows the user to specify any number of sides. There are many variations in the devices such as rectangles, polygons, lines, shapes tool lets you choose Shape, road, or pixels. The color is selected using the pop-up menu and a color to be selected by using the stroke width and it is set menu with wide strokes.
gradient tool
This tool is used to fill an area with a smooth blend between 2 or more colors. Select the gradient blue, red and yellow palette by clicking on the slopes. You can apply different gradient painted with a style to images. Click on the gradient palette to edit. Move to put the starting point and end for each. Click on a tab to select the color for each point, then click on the black tab to set the opacity and gradient editor.


Paint Bucket tool
This tool is used to fill any given area of your choice. Most programs need a region filled with vigor and is virtually in each draw. Press Ctrl + Delete command to clear the canvas and fill with.
retouching tools
Clone stamp tool
This tool is used to pick up a part of the image and copy it to another part of the picture. At the top of the window to the right of the clone stamp icon, select a brush by clicking on the icon. You need to choose what you are copying the facts before you can clone image. If you're going to hide the picture, hold down the Alt key and click on the image. To soften the hard edge of cloning to 0%.
If there is "alignment" is checked, it will result in flat tiles and patterns - if unchecked, it will start with all the tiles mouse click.
If the "Impressionist" is checked, it will give you random spots of color taken from the sample.
History Brush tool
This tool is used to get back to the previous version of your image and allows you to draw in the previous version. Choose from the Window menu and at the top of the window history, you'll see a thumbnail of the image. History of brushes with the press and hold the mouse and start painting. It will take you back to the previous version and use a paint brush image back to the original.
Tobacco treatment
This tool is used to draw on your images to another aspect of the image. It can provide a great natural result and the area around where you are painting. Make a small stroke on the image, you will see the missing parts of the picture.
Will Dodge
This tool is used to mask parts of the photo and block light to get shot, burned or let more light through, the dark area burned. Press Shift-O and switch to burning. Escaped from the water around the image. Observe how the water has become much darker, but the image is bright, almost all affected. You can make an image appear with the use Dodge and Burn tools.
advanced tools
Pen tool
This device is perfect and a more advanced tool for very precise and can be edited. It will need some practice to use well. Select a tool by clicking on the letter P on your keyboard. It would seem nib of a fountain pen.
If you see additional points, remove them by moving your cursor through point and press ALT + mouse click first point. Then expand further points will be removed.
First, determine the starting point on the image you want to select. You'll notice two fists extended from the first anchor point and click in line. Select the whole image by setting a target point by point.
If you move your cursor to the other anchor point, you'll see the line twisting like a rubber band. To close the loop, click on the first anchor point.
EmoticonEmoticon